Touches
Touches are implemented throughout Noticeboard Type Window. It is best experience with a Touch Screen as some handling will not be supported using a mouse, example scaling and rotating. Except for basic Window that do not support Touches, all Type Windows are supported and they are handled in a different manner.
For example a Fixed Window, besides allowing you to pan beyond it's boundary, it also allows you to freely move around any items, scale or rotate them with your fingers. In this case, no additional setting is needed. You manipulate with the object directly.
However in most cases you are going to link this object to a touch item or a series of items. This is how it is implemented.

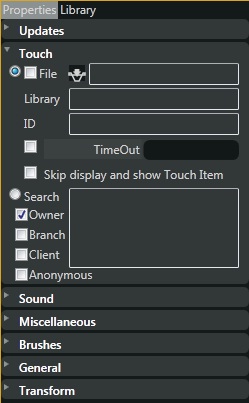
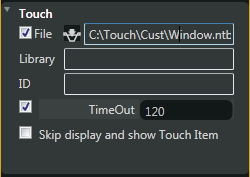
The above diagram is a standard touch configuration for a Type Window. If nothing is checked, it uses the Type Window rectangle area to display your touch item. This is the default which can be restrictive, example a Button Window where you only define a narrow strip for the Window display area. In this case, you need to display the content of the touch item in another display area ( as shown below the Touch area ). You have 2 choices for displaying your touch items.
1. Touch Board
A Touch Board is a single display area for holding your touch item. A Touch Board supports background graphics which allows you to create a feel for the objects to be displayed.
For Touch Board example see Touch Phone Application with NoticeBoard
2. Touch Pad
A Touch Pad has a header and a content body to display the touch item. The header can hold a series of items where you can scroll through.
Both choices support a hierarchy of touches linking together through the use of libraries or ntb project files (to be implemented).
Follow this example to know how to setup touches within the library.
Touches are implemented throughout Noticeboard Type Window. It is best experience with a Touch Screen as some handling will not be supported using a mouse, example scaling and rotating. Except for basic Window that do not support Touches, all Type Windows are supported and they are handled in a different manner.
For example a Fixed Window, besides allowing you to pan beyond it's boundary, it also allows you to freely move around any items, scale or rotate them with your fingers. In this case, no additional setting is needed. You manipulate with the object directly.
However in most cases you are going to link this object to a touch item or a series of items. This is how it is implemented.
The above diagram is a standard touch configuration for a Type Window. If nothing is checked, it uses the Type Window rectangle area to display your touch item. This is the default which can be restrictive, example a Button Window where you only define a narrow strip for the Window display area. In this case, you need to display the content of the touch item in another display area ( as shown below the Touch area ). You have 2 choices for displaying your touch items.
1. Touch Board
A Touch Board is a single display area for holding your touch item. A Touch Board supports background graphics which allows you to create a feel for the objects to be displayed.
For Touch Board example see Touch Phone Application with NoticeBoard
2. Touch Pad
A Touch Pad has a header and a content body to display the touch item. The header can hold a series of items where you can scroll through.
Both choices support a hierarchy of touches linking together through the use of libraries or ntb project files (to be implemented).
Follow this example to know how to setup touches within the library.
Last edited: