• IP addresses are NOT logged in this forum so there's no point asking. Please note that this forum is full of homophobes, racists, lunatics, schizophrenics & absolute nut jobs with a smattering of geniuses, Chinese chauvinists, Moderate Muslims and last but not least a couple of "know-it-alls" constantly sprouting their dubious wisdom. If you believe that content generated by unsavory characters might cause you offense PLEASE LEAVE NOW! Sammyboy Admin and Staff are not responsible for your hurt feelings should you choose to read any of the content here.

    The OTHER forum is HERE so please stop asking.

My Favourite Recipes & Supermarket Food Products : Instead of eating out, why not try these recipes / food products at home

edmwrefugee

Alfrescian
Loyal
How to Use a Bottle of Fish Sauce
www.seriouseats.com

Fish sauce may not have the sexiest name or the most appealing aroma, but there's a reason why the Southeast Asian liquid seasoning is a staple in pantries around the world. Not only is it a key ingredient in countless Thai, Vietnamese, and Indonesian preparations, but, like soy sauce and its fellow anchovy-based sauce, Worcestershire, fish sauce can be used to add a unique, savory complexity to dishes of any provenance. Here's a look at some of our favorite applications.

Memorable Marinades​

Overhead shot of a platter of grilled chicken wings with soy and fish sauce, garnished with cilantro leaves
Shao Z.

Whether you're grilling seafood, sautéing vegetables, or stir-frying steak, a fish sauce–spiked marinade can deliver a funky, umami-rich intensity to your favorite foods. Combined with chili, it adds savoriness and heat to grilled chicken wings. Tossed with shallots, lemongrass, garlic, sugar, and pepper, a splash of fish sauce flavors these enjoyable Vietnamese pork chops. Fish sauce seasons both our exceptionally juicy shell-on grilled shrimp and our homemade Vietnamese shrimp summer rolls; adds nuance to Thai-Style Beef With Basil and Chilies; and completes a quick, spicy stir-fry of beef, leeks, and onions. But fish sauce doesn't have to be limited to Southeast Asian preparations—it's a great foil for nutty-sweet Brussels sprouts, both roasted and deep-fried, and even makes its way into our recipe for carne asada.

Once you've finished marinating your ingredient of choice, I strongly recommend reserving the liquid—once simmered (to prevent any food-borne illnesses from the raw meat or seafood that's been soaking in it), it makes a phenomenal sauce. Use it to top whatever you've been marinating, or just hold on to it for the next time you're serving steak, chicken, or really anything that might benefit from a bright, assertive sauce.

Nuanced Sauces​

Using chopsticks to dip a dumpling in fish sauce-based sauce.
Vicky Wasik

And, speaking of sauces, fish sauce works wonders in more than just repurposed marinades. It's the secret ingredient in some of our favorite Italian sauces, like this slow-cooked Italian-American red sauce and our Slow-Cooked Bolognese. A combination of fish sauce and soy sauce adds savory depth to the gravy in our homemade poutine, while a mixture of mayonnaise, fish sauce, and chili sauce coats this Southeast Asian twist on grilled corn.

Fish sauce also makes quick work of any dipping sauce for dumplings and potstickers. Sample it in a traditional Thai nam phrig noom, or add it to a simple combo of cilantro, lime juice, garlic, and chili.

Complex Soups and Stews​

Overhead photo of chicken stew with fish sauce.
J. Kenji López-Alt

A dash of fish sauce may seem out of place in chili, but it's an ideal way to add meaty depth to soups and stews (and no, your dish won't taste like fish!). Need proof? Look no further than our quick pressure-cooker chicken chile verde or a bowl of Spicy Chorizo and Pinto Bean Chili. Fish sauce also amplifies the savory richness of our French Onion Soup, adds character to this Filipino-style chicken and rice soup, and seasons the broth for Traditional Beef Pho.

More of a seafood person? Fish sauce balances out the spices in this dish of mussels in a Thai-style red curry, and pairs seamlessly with coconut milk as the poaching liquid for cod seasoned with lemongrass and lime juice.

Punchy Salad Dressings​

Overhead photo of grain salad seasoned with fish sauce.
Jennifer Olvera

Fish sauce, lime juice, sugar, garlic, and chili combine for a bold, classic Southeast Asian salad dressing. Try it on top of a meaty Thai-Style Marinated Flank Steak and Herb Salad; spice-heavy pork larb; a Vietnamese salad of crispy fried tofu skin, rice noodles, and plenty of herbs and fresh vegetables; or this Northern Thai side dish of bean sprouts, herbs, and crunchy fried pork rinds.

The same fundamental dressing brings the sweet and sour flavors of green papaya salad home in this cabbage, apple, and carrot salad, and captures the sensibilities of a Thai steak salad in this rice- and vegetable-based twist. Try it topping some bittersweet pomelo, snappy green beans, and zucchini, or even add a dose of fish sauce to your next tuna salad sandwich for a deeper, more savory flavor.

Amped-Up Fried Rice​

Overhead photo of crab fried rice in serving dish with garnishes.
J. Kenji López-Alt

A finishing squeeze of fish sauce can bring flavor to fried rice without weighing things down. It helps our Fried Rice With Blistered Green Beans and Basil shine and highlights the briny sweetness of our fried rice with crab, made with fragrant jasmine rice and tossed with crisp cucumber, scallions, and a scrambled egg.

Surprisingly Savory Cocktails​

A Bloody Mary cocktail topped with fried shallots, with a lime wedge on the rim
Vicky Wasik

If, like me, you shy away from sweet cocktails and favor strong, spicy, savory drinks, consider adding a few drops of fish sauce to your next refreshment. I like it in my beer or, better yet, rounding out this Thai-inspired Bloody Mary in place of the more traditional Worcestershire sauce.
 

edmwrefugee

Alfrescian
Loyal
Lo Mai Kai Recipe (Steamed Glutinous Rice & Chicken 糯米鸡) – My Wok Life
www.mywoklife.com
0BE1EC86-39C8-431B-80C0-0B73B0CD5467

Lo Mai Kai Recipe (Steamed Glutinous Rice & Chicken 糯米鸡)​

74419222-20DF-4A18-8CBA-C4A58F709E32-1024x847.jpeg
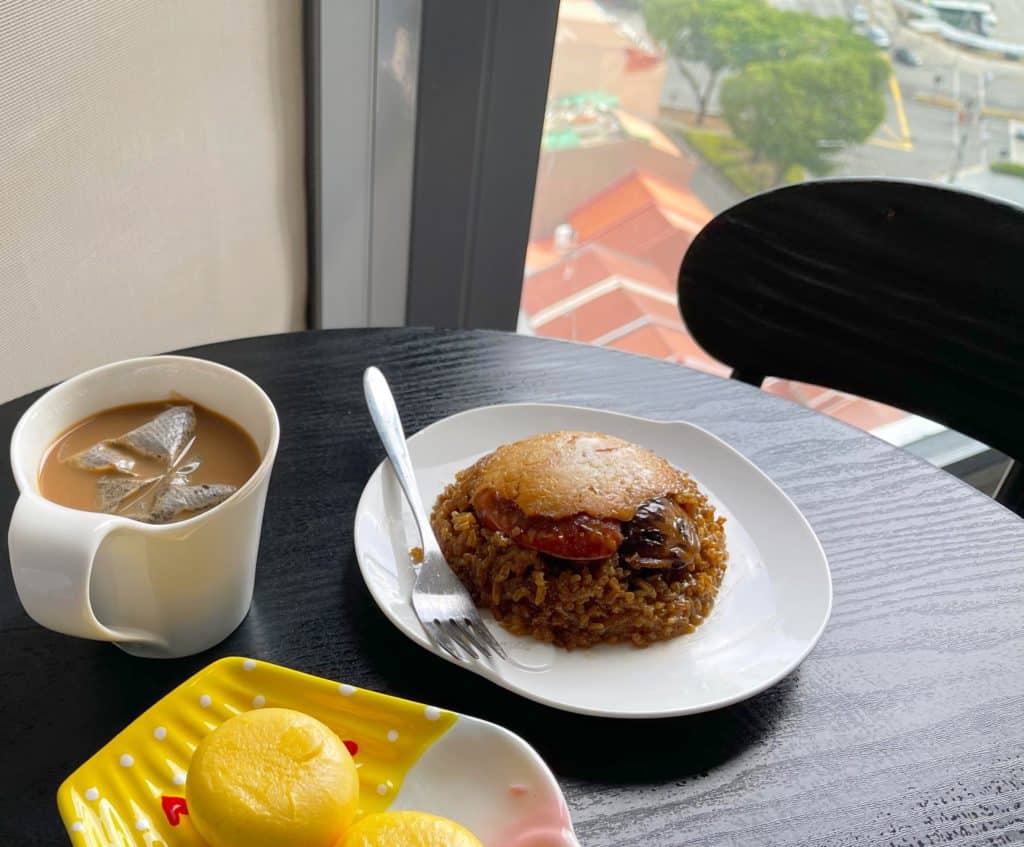
Delicious Dim Sum breakfast 美味点心早餐
Homemade Lo Mai Kai is simple to make. Do it yourself. 自制糯米鸡真的很简单。
Lo Mai Kai (name for glutinous rice & chicken in Cantonese) is one of the most popular dim sun dishes in Asian countries. Delicious rice dish, soft and sticky, aromatic and filling. Enjoy it while hot.
糯米鸡,是最受亚洲食客喜爱的点心其中之一。软软糯糯又充满米香的浓郁味道,真的好吃又饱腹。
D34CEF31-29ED-4B48-975C-9266957D6ACB-768x1024.jpeg
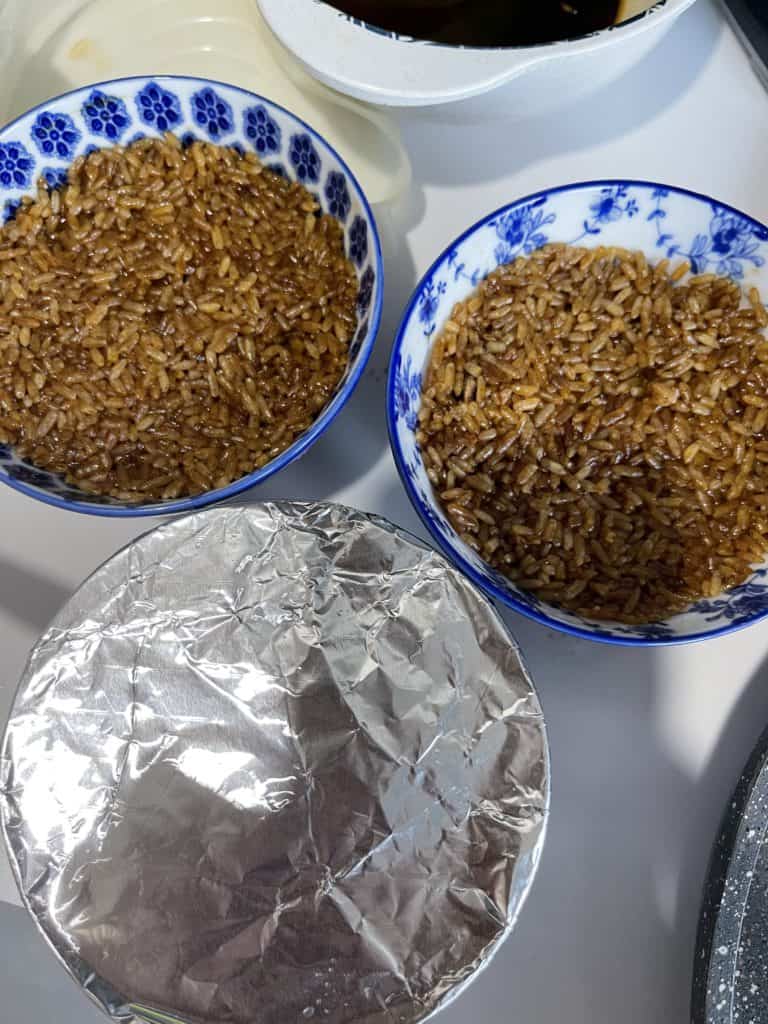
Any kind of bowl, even disposable aluminum foil bowl, for making Lo Mai Kai.

Serves 4 – 5

Ingredients (A):
2 cups of glutinous rice, soaked for 4 – 6 hours
1 tablespoon of light soy sauce
1 tablespoon of dark soy sauce
1 tablespoon of oyster sauce
1 tablespoon of sugar
1 teaspoon of chicken powder
Pinch of white pepper
Ingredients (B):
250g chicken meat, cut
1 tablespoon of light soy sauce
1 teaspoon of oyster sauce
1 teaspoon of Chinese Hua Diao Wine
1/2 teaspoon of sesame oil
1 tablespoon corn starch
Pinch of salt and white pepper
Ingredients (C):
4 large dried shiitake mushrooms, soaked and trimmed (keep the water of soaked mushrooms)
1 Chinese Lap Cheong sausage, sliced
2-3 shallot, chopped
2-3 tablespoon of oil

供4-5份
材料(A):
2杯 糯米,浸泡4-6小时
1汤匙 酱青
1汤匙 黑酱油
1汤匙 蚝油
1汤匙 糖
1茶匙 鸡粉
少许 白胡椒
材料(B):
250克 鸡肉,切块
1汤匙 酱青
1茶匙 蚝油
1茶匙 花雕酒
1/2茶匙 麻油
1 汤匙 玉米粉
少许 盐和白胡椒
材料(C):
4个 大冬菇干,浸泡及剪根椴(留浸泡过冬菇的水)
1根 腊肠,切片
2-3个 红葱头,切碎
2-3汤匙 油
5748C330-18FB-4516-930E-AE0EE4280AC1.png
材料众多,但制作方法简单。
Long ingredients list, but it’s easy to make.

Method:
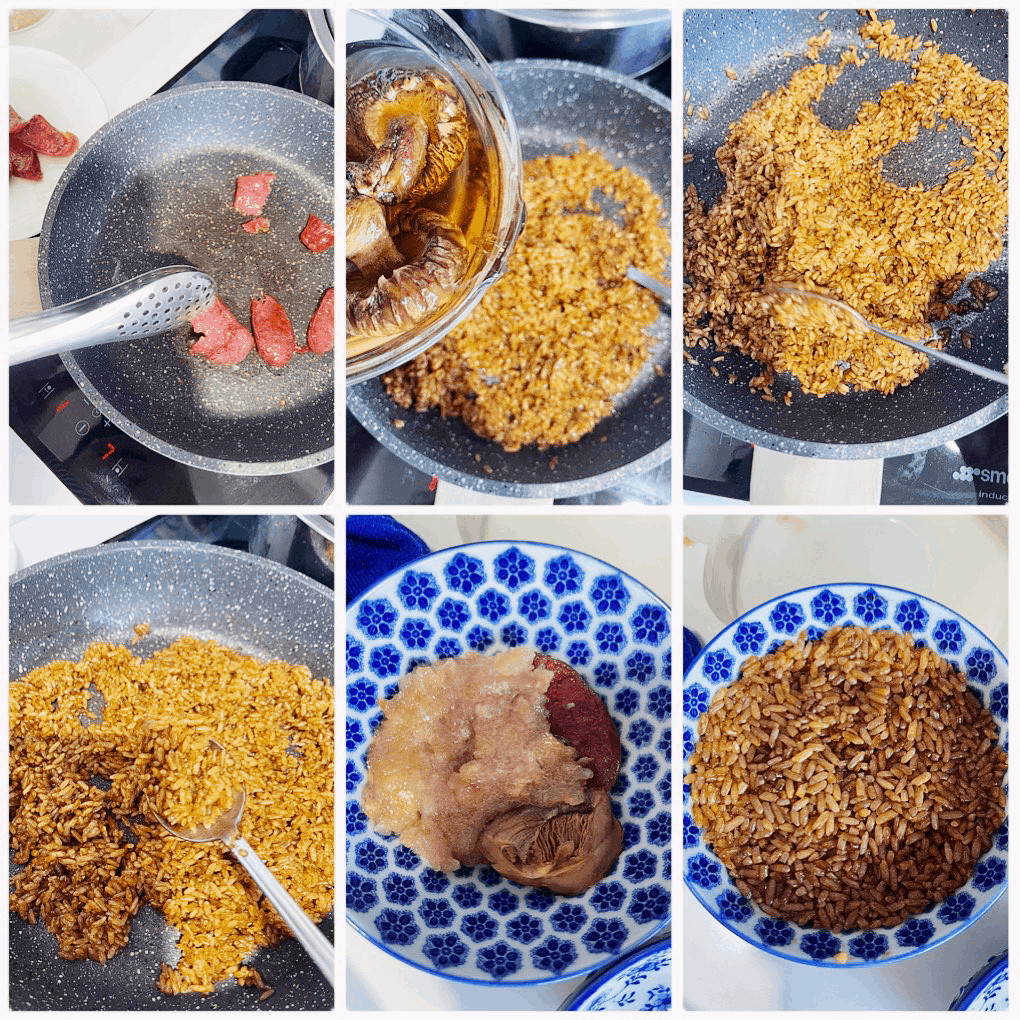
(1) Wash dried mushrooms and soak with 5 cups of water until soften. Trim and cut halves. Set aside. Do not discard the mushroom water, keep for later.
(2) Soak glutinous rice in water for at least 4 hours. If soaking for longer hours, change water every 6 hours. Rinse and drain. Season soaked glutinous rice with listed ingredients (A), marinate for at least 20 min.
(3) Season chicken meat with listed ingredients (B), marinate for at least 20 min.
(4) Pan fry sliced Lap Cheong over medium fire, until aromatic. Dish out and set aside.
(5) Add in oil, and saute shallot until aromatic. Add glutinous rice. Stir fry, add mushroom water, bit by bit, 2 tablespoons each time, until rice plumped up and almost cooked. 2/3 amount of mushroom water should be used. Keep the remaining mushroom water for later.
(6) Assemble Lo Mai Kai: Arrange 2-3 slices of Lap Cheong and some chicken meat in a small bowl. Fill in glutinous rice, until almost full. Combine the chicken marination gravy with remaining mushroom water. Spoon 3-4 tablespoons of mushroom water mixture over the bowl of rice. Cover bowl with aluminium foil.
(7) Repeat step (6) for another 3-4 bowls, or until all ingredients used up. Steam Lo Mai Kai on high heat for 1 hour. When done, invert bowl of Lo Mai Kai onto a plate to serve.
0BE1EC86-39C8-431B-80C0-0B73B0CD5467-1024x768.png
Steaming hot delicious glutinous rice & chicken dish. 芬香扑鼻的软糯可口糯米鸡。

做法:
(1)洗净干冬菇并用5杯份量的水浸泡直至变软。剪点了根椴并切成两半,备用。不要丢弃冬菇水,留待备用。
(2)糯米在水中浸泡至少4个小时。如果浸泡时间较长,则需每6小时换水一次。冲洗并沥干。用列出的材料(A)腌制糯米,至少20分钟。
(3)用列出的材料(B)腌制鸡肉,至少20分钟。备用。
(4)中火,把腊肠煎香。碟出,备用。
(5)加入食油,将葱头炒香。加入糯米。翻炒,一点一点地加入冬菇水,每次2汤匙,把大概2/3份量的冬菇水用掉,直至糯米膨胀并差不多炒熟。保留剩余的冬菇水以备后用。
(6)组织糯米鸡:将2-3片腊肠和一些鸡肉块放进一个小碗中。填入糯米,直到差不多满。将鸡肉腌制的汁和剩余的冬菇水混在一起,在碗里淋上3-4汤匙。用铝箔纸盖住碗。
(7) 重复步骤(6),直到所有配料用完。大概可备多3-4碗。把所有糯米鸡高温蒸上1小时。完成后,将糯米鸡倒入盘子中,即可食用。
3B80D54F-E131-42E5-98A8-26F0915BD55F-768x1024.jpeg
My Lo Mai Kai counts about 280kcal since it’s less oil, less fat.
自己做的糯米鸡去皮少油,仅280卡路里。

Tips: Your choice of chicken meat, drumstick, thigh, breast, or mince meat. I used minced meat this time. * Measure glutinous rice with the same cup as cooking white rice will do.
温馨提示:您可以选择喜欢的鸡肉部位,鸡腿,大腿肉,鸡胸或肉碎。这次我用了鸡肉碎。
* 糯米的份量可以用量白米的杯子相同。
 

edmwrefugee

Alfrescian
Loyal
Pineapple Fried Rice Recipe & Video Tutorial
hot-thai-kitchen.com

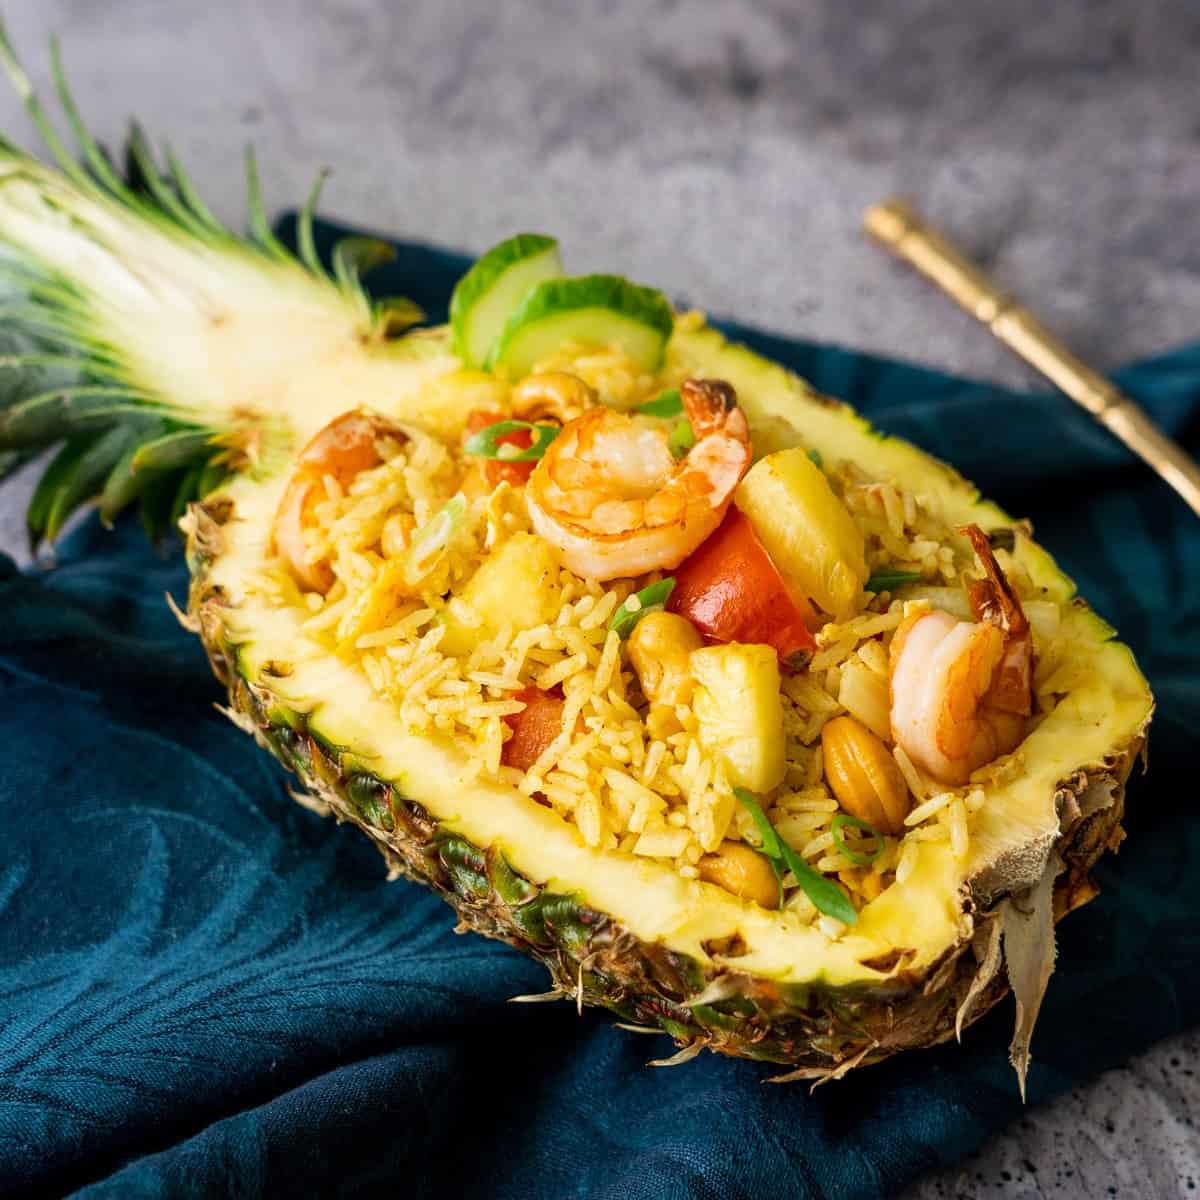
Many people seem surprised when I tell them that pineapple fried rice is a real Thai dish, not just a tourist-trap meal in beach-side resorts! It's a delicious and quick dish that only takes a few minutes on the stove (watch me cook it in real time in the video!). But with so many components, it can be a bit tricky to get the balance right. Read on and I'll share my perfected recipe, important tips, and how to make a pineapple bowl efficiently should you want to add a wow factor!
pineapple fried rice in a pineapple bowl

Ingredients​

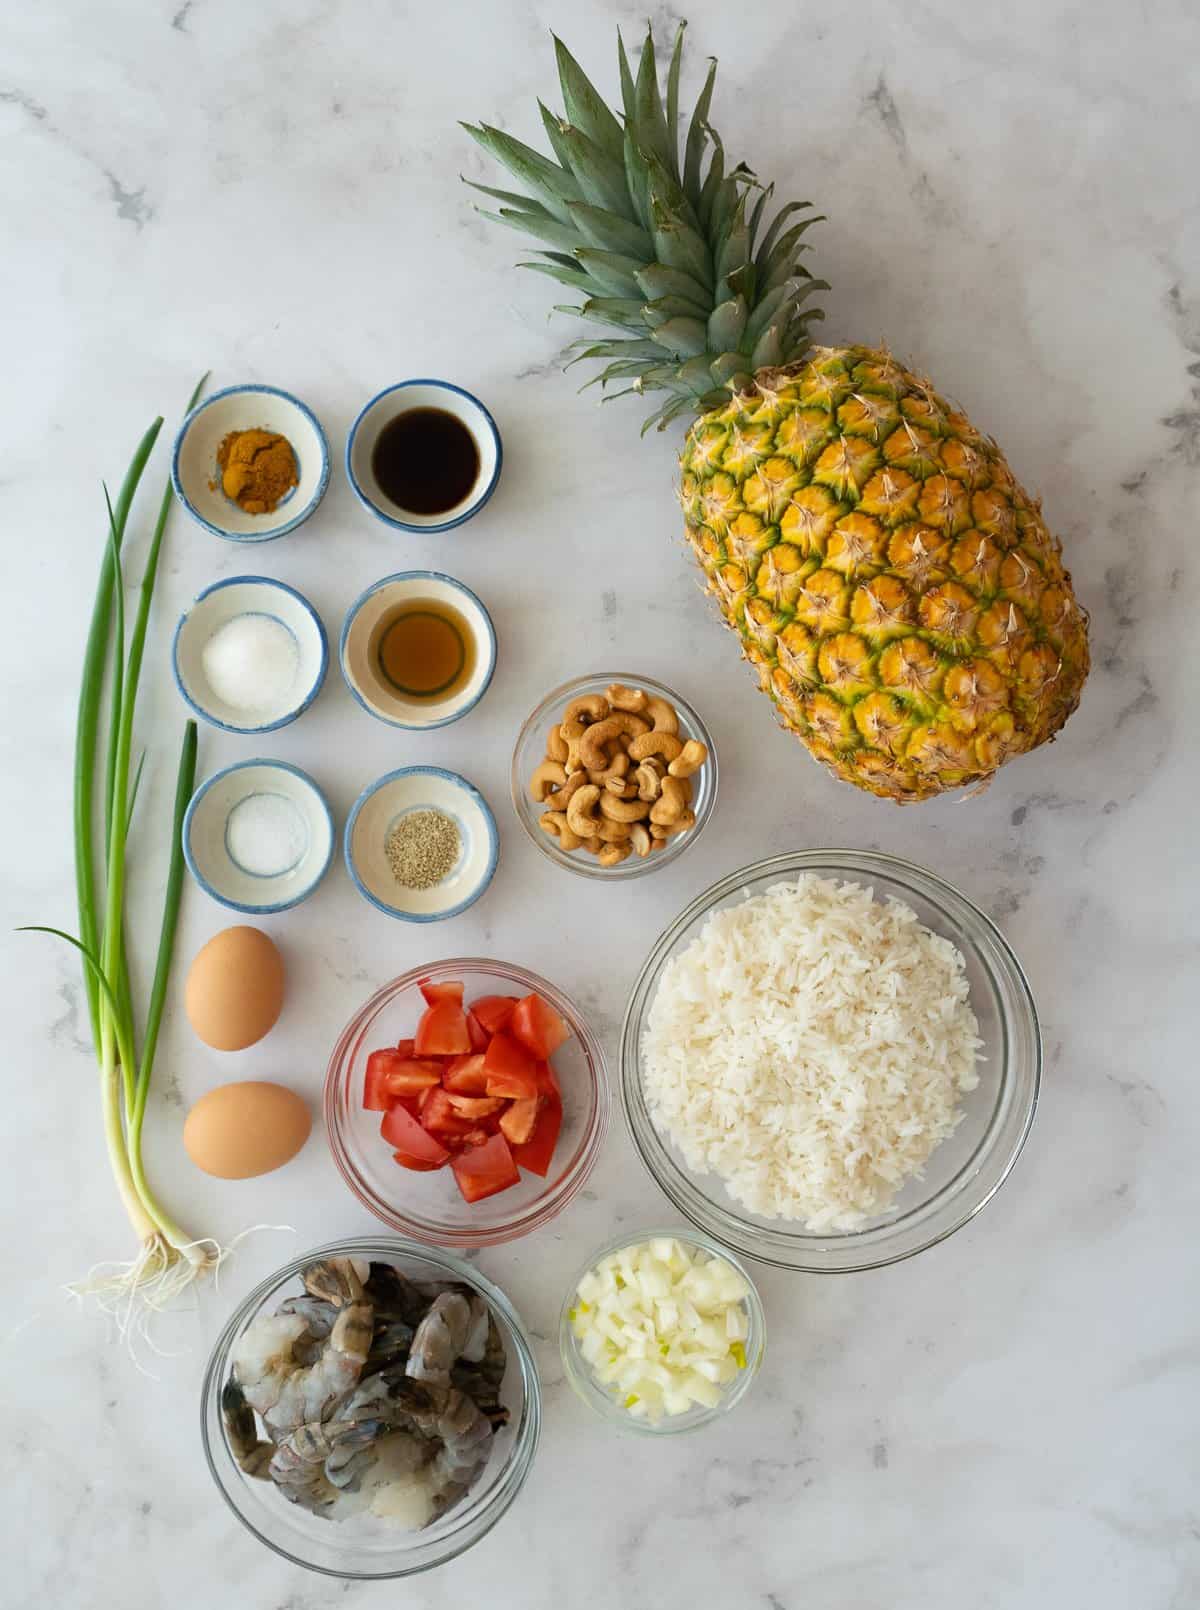
Here are the ingredients for Thai pineapple fried rice. It's mostly basic stuff you can find at regular grocery stores, but I've noted some important things to keep in mind!
ingredients for pineapple fried rice
  • Fresh pineapple - with the emphasis on fresh. Canned pineapple is either going to be too sweet, which will clash in a savoury dish, or it will have a lackluster flavour. This is the difference between a great pineapple fried rice, and the mediocre one you get from takeout. It doesn't need to be a super sweet pineapple, but do wait for the skin to be yellow (as in the picture above) to make sure it's ripe and flavourful.
  • Curry powder - my favourite is the Japanese S&B brand curry powder, which is available at most Japanese grocery stores or in the Japanese section of Asian stores. But whatever curry powder you have will work; my only rule is that you have to love how it smells!
  • Plain or coconut rice - plain jasmine rice is the classic, but for a richer fried rice, use coconut rice. More on that below.
  • Shrimp - a common protein pairing, but you can also substitute chicken or tofu, more details in the FAQ.
  • Cashews - roasted and unsalted, but if you've got salted it's not a big deal. For extra crunchy and nutty cashews though roast them again to get them a little darker. More on this in my cashew chicken recipe.
  • Tomatoes - I prefer roma tomatoes, which are the least watery.
  • Fish sauce - want to learn more about fish sauce? See my ultimate guide to fish sauce.
  • Soy sauce
  • Sugar
  • Salt
  • White pepper
  • Eggs
  • Onions
  • Green onions

How to Make Pineapple Fried Rice​

Here's a bird's eye view of how to make pineapple fried rice, and how to make a pineapple bowl for serving if you want to make it fancy. I highly recommend you watch the full video tutorial before starting to ensure success!

How to make a pineapple bowl efficiently​

I've devised a method for making a pineapple bowl that will get you a perfect bowl and yield ready-to-use pineapple pieces all in one fell swoop. No need to chop anything further, and no juicy mess on the cutting board!
How to cut a pineapple bowl
  1. Cut the pineapple in half right through the green top, then use a sharp paring knife to score the pineapple all around the edges to create the bowl shape. Don't get to close to the edge or your bowl will be flimsy.
  2. Cut along the two sides of the core, angling your knife 45 degrees, going deep enough to make sure the two cuts meet.
  3. Remove the core; this is what will allow the pieces to be ready to use without further chopping.
  4. Score the pineapple into a grid, making each piece around 1-cm wide, then use a flat-ish spoon to scoop out the pieces. The bottom part is tricker to remove, but just hack it however you need to, as you will already have enough nice pieces for the fried rice by the time you get there.

For the Pineapple Fried Rice​

process shots for making pineapple fried rice steps 5-8
  1. Sear the shrimp in a hot work until they are done. Remove from the pan.
  2. In the same pan, add the eggs and scramble until 90% cooked.
  3. Add the rice and onions and toss to mix.
  4. Add all dry spices and seasonings and toss until well distributed.
process shots for making pineapple fried rice steps 9-12
  1. Add the pineapple and toss until the pineapple is heated through, then let the rice toast while flipping a few times to develop some charring.
  2. Off heat, add the tomatoes, cashews and green onions.
  3. Toss briefly just until mixed.
  4. Serve on a plate or in the pineapple bowl and put the shrimp on top!

Pineapple Bowl - To Make or Not to Make​

If you're serving for guests, you might wonder whether it's worth the effort to make the pineapple bowl. Listen, I used to be "anti-pineapple bowl" because it reminded me of Westernized, touristy pineapple fried rice that doesn't actually taste any good, and I always thought it was too much work. But I've since changed my stance on that for two major reasons:
  1. Using my method, it doesn't take any more time to make a pineapple bowl than to peel and cut a pineapple, and it's even less messy.
    If you follow my tips, you'll have the bowl and all your pineapple pieces ready for the fried rice all in one go; no further chopping needed. And the mess will be contained in the pineapple, rather than the epic mess that usually results from peeling and chopping a pineapple.
  2. People are just wayyyy more excited about it.
    You bring fried rice out in a pineapple bowl and it's going to instantly receive all sorts of "wow's" and "amazing's" from your guests, and they're going to take photos of it and probably post it to Instagram. You bring the same fried rice out on a plate and the response is gonna be: "Nice, let's eat." You KNOW I'm right!

Important tip for serving fried rice in a pineapple bowl​

Be sure to dry the pineapple bowl thoroughly. If the rice is going to sit for any time at all before people are ready to eat, line the bottom with some lettuce or parchment paper to avoid the bottom part of the rice getting soggy. Basically unless hungry people are sitting and waiting for the rice to arrive, line the bottom.

Jazzing it up: Using Coconut Rice​

Pineapple and coconut are a flavour match made in heaven as we all know (piña colada, anyone?). So when a Patreon member told me that he used coconut rice for his pineapple fried rice, and topped it with shredded coconut, I was intrigued.
To my surprise, using coconut rice alone doesn't make the rice taste coconutty at all, but it makes the fried rice richer and a little more filling. But the unexpected bonus was the fact that it made making the fried rice much easier.
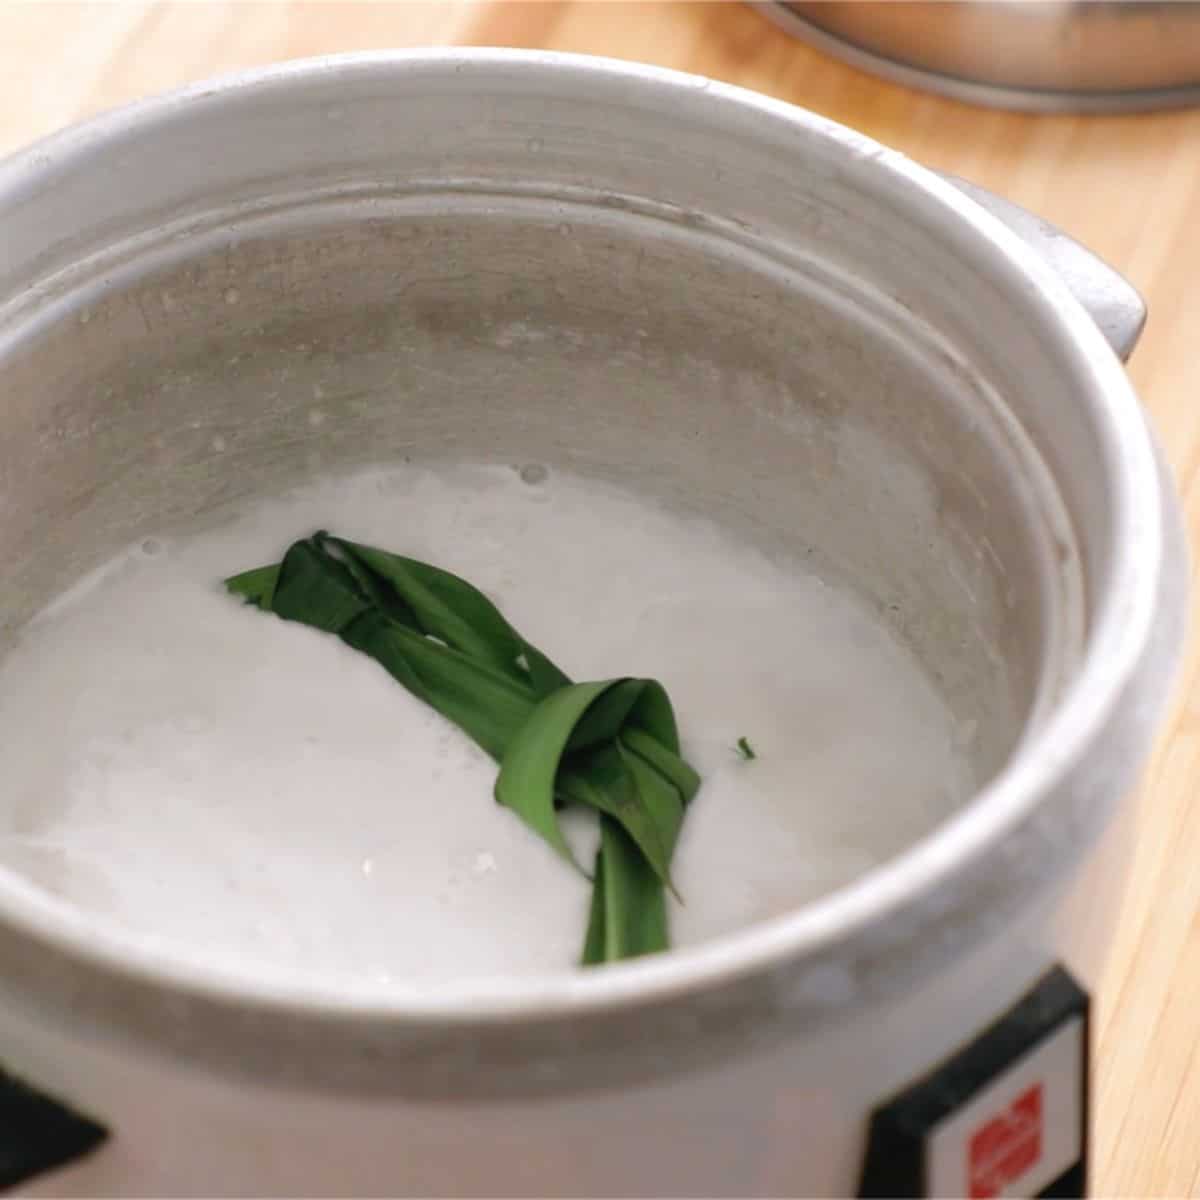
rice cooked with rice, coconut milk and pandan leaf
Making coconut rice is as simple as replacing half of the water with coconut milk, in a rice cooker or stove-top. If you have a pandan leaf handy, throw it in as well.
The fat in the coconut milk coats the grains, making them separate beautifully, and I've never had an easier time getting fried rice seasoning to coat every grain. It's as simple as replacing half of the water with coconut milk when you cook rice, so no extra work added there.
If you want the coconut flavour to actually come through, I suggest getting some desiccated coconut, either shredded or flakes, and toasting them until nice and browned, then sprinkle it on top of your final dish.
Note: If you want to make coconut rice as a side dish to a meal, a little extra seasoning is needed. Check out my coconut rice recipe here.

Frequently Asked Questions​

How can I make pineapple fried rice vegan?
You can substitute equal amounts of soy sauce for the fish sauce, and sub firm tofu for shrimp. I suggest marinating the tofu in some soy sauce, and then give it a quick fry to firm up the surfaces. If you don't eat eggs, you can omit and add a little more tofu.
How can I make pineapple fried rice in advance?
The cooking for pineapple fried rice is very quick (as shown in the video in real time), so you might consider measuring out all ingredients, chopping the vegetables, cooking off the protein, and combining the seasonings so that everything is ready to be thrown into the wok.

If you want to make the fried rice in advance you absolutely can, and it reheats well, but do not add the cashews, tomatoes and green onions. Toss those in after reheating, right before serving.
Can I use chicken instead of shrimp?
Yes, to substitute chicken, slice 8 oz (225 g) chicken breasts or thighs into 1 cm thick strips, then marinate in 2 tsp (10 ml) soy sauce, ¼ tsp (1.25 ml) sugar, and 1 Tbsp (15 ml) water for at least 15 minutes, stirring halfway in between. Cook it the same way as the shrimp in the recipe.
Before you start, be sure to watch the video tutorial to ensure success! I always include little tips and tricks not mentioned in the blog post. The video is in the recipe card below, but you can also watch it on YouTube!
pineapple fried rice in a pineapple bowl

Thai Pineapple Fried Rice​

A popular Thai dish bursting with flavours of curry powder, pops of fresh pineapple and crunchy cashews. Serve in a pineapple bowl for that extra "wow" factor. It's quick and easy, with the option to use coconut rice for extra richness.
Print Recipe Pin Recipe Share
Servings 2 generous servings

Ingredients​

  • ▢ 1 ¼ tsp curry powder, see note 1
  • ▢ ½ tsp white pepper
  • ▢ 1 ½ tsp sugar
  • ▢ ¼ tsp table salt
  • ▢ 2 tsp soy sauce
  • ▢ 2 tsp fish sauce
  • ▢ 1 ½ tsp shrimp paste in oil, optional, see note 2
  • ▢ 3 Tbsp neutral oil
  • ▢ 12 medium to large shrimp, or as many as you want, peeled and deveined, see note 3
  • ▢ 2 eggs
  • ▢ 375 grams cooked jasmine rice or coconut rice, recipe follows, see note 4
  • ▢ ½ cup small diced onions
  • ▢ 1 cup fresh pineapple, ½" x ½" x 1" pieces
  • ▢ 2 Tbsp raisins, optional
  • ▢ ½ cup roasted cashews, unsalted
  • ▢ 2 green onions, chopped
  • ▢ 1 roma tomato, 1-inch diced
  • ▢ Pineapple bowl for serving, optional
  • ▢ Cucumber slices for serving, optional
  • ▢ Toasted shredded coconut for serving, optional, see note 5

Coconut Rice​

  • ▢ ¾ + ⅛ cup uncooked jasmine rice
  • ▢ ½ cup water
  • ▢ ½ cup coconut milk
Check Out Ingredients and Kitchen Tools I Use

Notes​

  1. My preferred curry powder is the Japanese S&B brand, though any generic curry powder will also work as long as you like how it smells!
  2. Shrimp paste in oil is shrimp tomalley (fat) that has been cooked with some seasoning and herbs. See video for what the jar looks like. If using coconut rice, try to drain off most of the oil from the shrimp paste to avoid making the rice too oily.
  3. To sub chicken, slice 8 oz (225 g) chicken breast or thighs into 1 cm strips, then marinate in 2 tsp soy sauce, ¼ tsp sugar, and 1 Tbsp water for at least 15 minutes. Cook it the same way as the shrimp.
  4. Using coconut rice instead of plain rice in this dish adds a richness and makes the rice much easier to separate in the wok. The recipe for the coconut rice provided should yield just about the 375 g of cooked rice that you need.
  5. Using coconut rice adds richness, but it won't taste coconutty. If you want it to taste coconutty, top the fried rice with some toasted dried shredded coconut.

FULL VIDEO TUTORIAL​


Thai Pineapple Fried Rice Recipe
0 seconds of 12 minutes, 31 seconds
Thai Turnip Cake Stir Fry Recipe (Kanom Pakkaad) ขนมผักกาด - Hot Thai Kitchen
All my recipes come with step-by-step video tutorials with extra tips not mentioned in the blog post, so make sure you watch the video to ensure success. If you enjoy them, consider subscribing to the YouTube Channel to not miss an episode. Thank you!
Subscribe to my YouTube Channel

Instructions​

For the coconut rice (optional)​

  • Cook it as you would normal jasmine rice, in the rice cooker or stovetop. There's no need to mess with cooling it down because the coconut rice will spread so easily in the wok, so just fluff it and leave it at that. In fact, refrigerating coconut rice will make the rice stick together more as the coconut fat congeals.
    ¾ + ⅛ cup uncooked jasmine rice, ½ cup water, ½ cup coconut milk

For the Pineapple Fried Rice​

  • If making a pineapple bowl for serving, check out the video for a tutorial on how to make a pineapple bowl AND cut perfect pineapple pieces for the fried rice all in one go.
  • Combine curry powder, white pepper, sugar and salt and stir to break up the curry powder. This will make it much easier to distribute the curry powder into the rice evenly.
    1 ½ tsp sugar, 1 ¼ tsp curry powder, ½ tsp white pepper, ¼ tsp table salt
  • Combine the soy sauce, fish sauce and shrimp paste in oil (if using) in a small bowl.
    2 tsp soy sauce, 2 tsp fish sauce, 1 ½ tsp shrimp paste in oil
  • In a wok or a large frying pan, heat 2 Tbsp of neutral oil until hot over high heat. Sear the shrimp without stirring until they're at least halfway done and slightly browned on the underside; flip and cook the other side just until done. Turn off the heat and remove the shrimp from the pan, leaving all the oil behind.
    3 Tbsp neutral oil, 12 medium to large shrimp, or as many as you want
  • Add more oil to the wok if needed, then add the eggs and scramble slightly. When the egg is half way cooked, add the rice and onions and toss to mix.
    2 eggs, 375 grams cooked jasmine rice or coconut rice, ½ cup small diced onions
  • Add the dry seasoning and the fish sauce + soy sauce and toss until the rice grains are evenly coated in the seasoning.
  • Toss in the pineapple and raisins (if using) then allow the rice to sit undisturbed for 10-15 seconds to allow the rice to toast and brown slightly. Toss everything and repeat the toasting process a few more times.
    1 cup fresh pineapple, 2 Tbsp raisins
  • Turn off the heat and stir in the cashews, tomatoes and green onions. Serve on a plate or in a pineapple bowl for a "touristy" version, and add a garnish of cucumber slices and/or shredded coconut, if desired. Enjoy!
    ½ cup roasted cashews, 2 green onions, 1 roma tomato
Watch my videos AD-FREE and get bonus content on Patreon!
Tried this recipe? Share a pic!Tag @hotthaikitchen on Instagram and Twitter!
 

edmwrefugee

Alfrescian
Loyal
Three Cup Chicken Recipe (Taiwanese Style) | Christine's Recipes: Easy Chinese Recipes
en.christinesrecipes.com

Three Cup Chicken is a very popular and tasty Taiwanese dish that you'll definitely find at any Taiwanese restaurants. To make this dish at home, it's downright simple and easy.

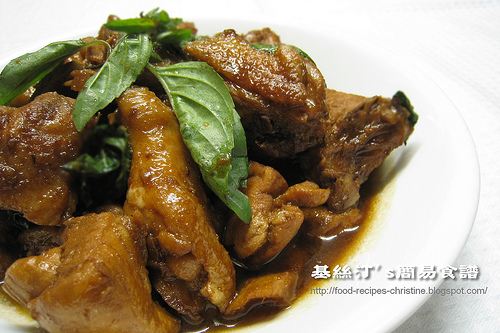
 Stewed Chicken in Three Cups Sauce三杯雞


After moving to Australia, I’ve been very lucky to have many chances to try some Taiwanese foods because many Taiwanese run their gorgeous restaurants here. Nearly all the Taiwanese restaurants would have one of their famous dishes called “Three Cup Chicken” (三杯雞) on their menus.

At first, the name of the dish caught my sight and aroused my curiosity. “Three cups”? Ha, interesting! What is the "three cup sauce"? Many of my Taiwanese friends know this dish of course.

Again, I was lucky enough to get the recipe and tried it at home.

“Three cup sauce” actually includes rice wine, sesame oil and soy sauce in the proportion of 1:1:1 Adding basil into the stewed chicken is a must and make this dish very unique in taste and smell. The sauce is perfectly balanced and the basil makes the chicken irresistible. Similar to what people say, “Love at first sight”, yet I fell in “love at first taste”.

(Printable recipe)

By Christine’s Recipes
Prep time: 15 mins
Cook time: 30 mins
Yield: 2 to 3 serves

Three Cup Chicken

Ingredients:
  • 650 gm (whole or half) fresh chicken
  • 1 cup fresh Taiwanese basil (九層塔)
  • 1 shallot, sliced
  • 5 braids garlic, chopped
  • 1 thumb-sized ginger, sliced or smashed
Sauce:
  • 2 Tbsp light soy sauce
  • 2 Tbsp dark soy sauce
  • 2 Tbsp rock sugar (冰糖), chopped smaller
  • 2 Tbsp cooking rice wine
  • 2 tsp sesame oil
  • 3/4 cup water
Taiwanese basil (九層塔)

Method:
  1. Rinse and drain chicken, then cut into chunks.
  2. Heat 2 tablespoon oil to sauté ginger, garlic and shallots until fragrant. Add in chicken chunks and continue to sauté. When the chicken turns white in color, pour in the sauce ingredients and cook on high heat, bring it to boil. Cover with a lid, lower heat. Cook ingredients for about 30 to 40 minutes till tender and done.
  3. When sauce begins to thicken, turn off the heat and add basil. Stir well. Dish up to serve.
Notes:
  • Rock sugar is pure sugar cane in lumps, available at Asian grocers. Or you can order from Amazon. It will work like a charm balancing all the flavours of soy sauce and make the sauce look a bit glossy.
 

edmwrefugee

Alfrescian
Loyal
Shaoxing Goji Chicken (花雕杞子雞煲) | Christine's Recipes: Easy Chinese Recipes
en.christinesrecipes.com

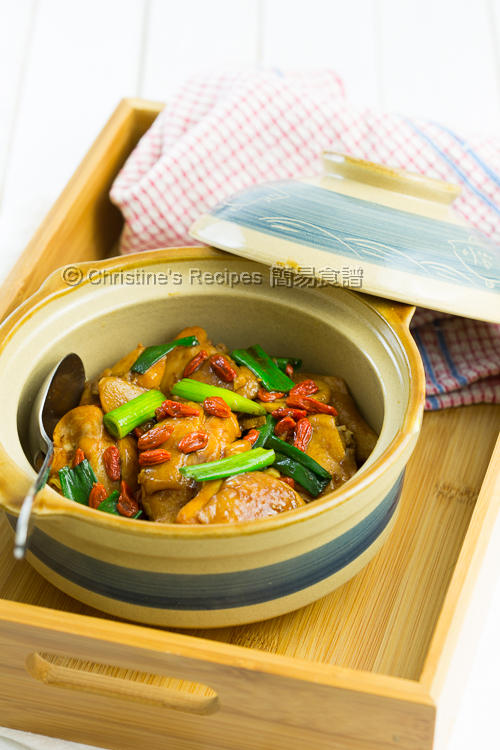
Traditionally, this Shaoxing Goji Chicken is a claypot dish made in winter days. I reckon this dish can be enjoyed on any days throughout the year. It’s so tasty with splendid aroma, perfectly goes with steamed rice.

Shaoxing Goji Chicken Claypot01

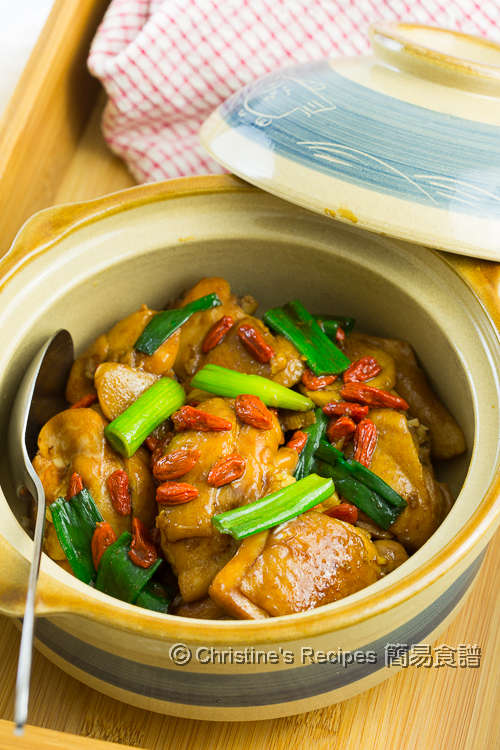
I like the colour contrast of this chicken dish. It’s so appealing to the family’s eyes. Once it’s served on our dining table, everyone was eager to dig in and taste.

Shaoxing Goji Chicken Claypot02
If your family is not too quite into the shaoxing wine aroma, or you have kids or seniors, you might skip the wine part as it won’t comprise the taste of the whole dish at all.

Yet, I highly recommend you to follow the traditional cooking way and add the wine because it will make the whole dish smell so good.

To make this dish, it’s best to use chicken parts with bones, like chicken legs or chicken thighs with bones. Simply use a very sharp cleaver to chop them into large chunks, so that they are easily cooked through.

Beware of the bones if you have young kids though. Marinade the chicken pieces beforehand.

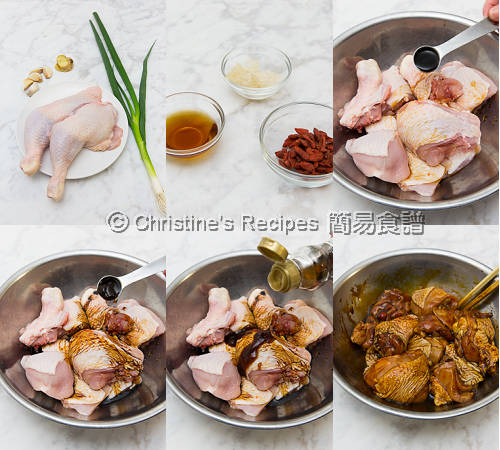
Shaoxing Goji Chicken Claypot Procedures01
While cooking, the marinated chicken pieces are braised with shaoxing wine in the first stage. The alcohol will be gone because of the heat, leaving a mild sweetness behind.

Shaoxing Goji Chicken Claypot Procedures02
Once the chicken is cooked through, you might like to sprinkle more of shaoxing wine just before serving onto your dining table. When you open the pot lid, the wine aroma will escape and do the trick of attracting your guests’ appetite. That’s the highlight of this shaoxing chicken dish.

Personally, I like to top this dish up with some goji berries adding more nutrients and a contrast in colour.

You won’t know how tasty the goji berries are before you taste them. They absorb all the goodies in the sauce.

Speaking about the sauce, my family didn’t want to miss any bit of it since the sauce taste heavenly delicious. I tried to drain out every single goji berry and didn’t want to miss any one of them.

(Printable recipe)
By Christine’s Recipes
Course: Chicken
Cuisine: Chinese
Prep time: 15 mins
Cook time: 30 mins
Yield: 2 to 3 serves

Shaoxing Goji Chicken Claypot03
Ingredients:
  • 2 (about 690 gm) chicken legs
  • 5 to 6 cloves garlic, sliced
  • 6 to 8 slices ginger
  • 2 Tbsp Shaoxing wine (Hua Diao wine) + 1 Tbsp wine (optional, sprinkle when served)
  • ¼ cup water
  • 25 gm rock sugar (冰糖), roughly chopped
  • 1 spring onion, julienned
  • 1 red chilli, optional, chopped
  • 2 Tbsp (about 20 gm) goji
Marinade:
  • 3 tsp light soy sauce
  • 1 tsp dark soy sauce
  • 1 tsp oyster sauce
  • 2 tsp sesame oil
Method:
  1. Rinse the chicken legs. Wipe dry with kitchen papers. Cut into 2 to 3 pieces. Mix with marinade well. Set aside for 30 minutes. Rinse goji and soak in water for 5 minutes. Drain well. Set aside.
  2. Heat oil in a wok over medium-high heat. Saute garlic and ginger. Add in chicken pieces. Stir fry and cook until the surface colour changes. Pour in water. Add rock sugar. Sprinkle 2 tablespoons of Shaoxing wine (Hua Diao wine). Cover and cook for 15 to 20 minutes, or until the chicken is cooked through and sauce is reduced by half and thickened. Add spring onion, red chilli and goji. Stir to combine. Stir in 1 tablespoon of wine before serving if you like more wine aroma. Serve hot.
Notes:
  • You can use half of a chicken instead.
  • The chicken will release some water while cooking. So don’t add too much water at the first stage. You might add in some water later if necessary.
  • The power of every stove is not the same. Please adjust the cooking time accordingly.
  • Don’t over cook the Goji. The residual heat in the wok or pot is good enough to cook through the goji.
 

edmwrefugee

Alfrescian
Loyal
Pork & Bean Sprout Omelette
(With Video) | Christine's Recipes: Easy Chinese Recipes
en.christinesrecipes.com


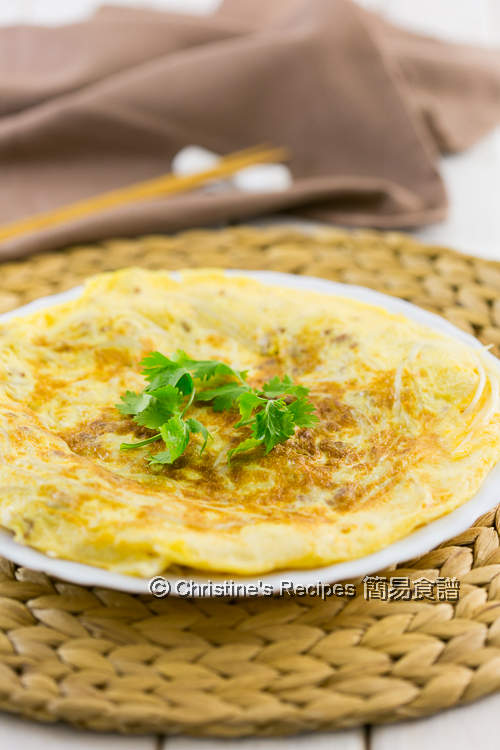
There are plenty of ways to cook eggs. One of my favourite ways is to simply pan fry them with some vegetables and/or meat. I used bean sprouts and pork the other day. My family was just loving it.

Pork & Bean Sprout Omelette01

The omelette was gone in a few minutes. The dish can be done within 15 minutes as long as you have silver sprouts (銀芽) ready, that their ends are trimmed.

To prepare silver sprouts is not that difficult, yet quite time consuming. For convenience, you can skip this step. All parts of a bean sprout can be eaten after all. This Hong Kong style omelette dish is best served with light soy sauce and chilli sauce.

(Printable recipe)
By Christine’s Recipes
Course: Eggs, Pork
Cuisine: Chinese
Prep time: 10 mins
Cook time: 15 mins
Yield: 2 to 3 serves

Pork & Bean Sprout Omelette02
Ingredients:
  • 160 gm bean sprout, trimmed ends
  • salt, to taste
  • 90 gm pork mince
  • 3 large eggs
  • 2 Tbsp water
  • coriander, for garnish
Marinade:
  • 1 tsp light soy sauce
  • ¼ tsp sugar
  • ½ tsp corn flour / corn starch
  • 1 tsp oil
Pork & Bean Sprout Omelette Procedures
Method:
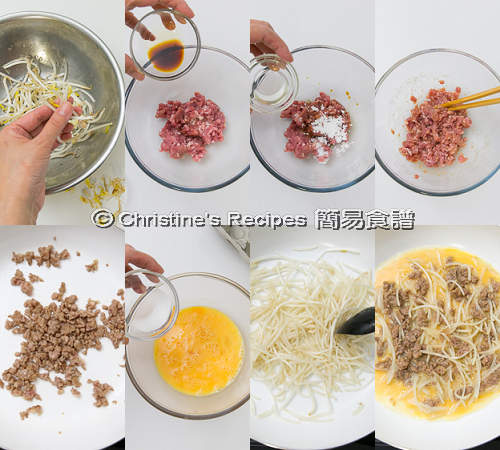
  1. Trim away both ends of the bean sprout. Rinse and drain very well.
  2. Mix pork with marinade. Set aside.
  3. Heat oil in a pan over high heat. Saute the bean sprout until wilted. Season with a bit of salt. Don’t need to cook too long as you want to retain the texture in the omelette. Set aside to cool down a bit.
  4. Reduce heat to medium. Add oil and cook the pork until done. Use a spatula or wooden spoon to break up any lumps. Set aside to cool down a bit.
  5. Whisk the eggs. Add water. Mix well. Stir in the bean sprout and pork. Pan fry over medium high heat until both sides are brown. Garnish with coriander. Serve hot.

  • Quickly saute the bean sprout first. Having done that, the bean sprout won’t release any water while frying with eggs.
  • You may pan fry the egg, pork and bean sprout mixture in two or three batches.
  • When pan frying the omelette, it’s recommended to add enough oil to coat your pan. Before adding the egg mixture, your pan needs to be heated nice and hot. Then your omelette will look good and smell fragrant.
 

edmwrefugee

Alfrescian
Loyal

Sometimes, when I am sick of eating instant noodles as it is, I like to fry them with meat, vegetables and prawns. This YouTube video gives you an idea of how to do it. You can vary your ingredients to create different fried noodles.
 

edmwrefugee

Alfrescian
Loyal
This is very simple and nutritious for the whole family. I usually do this with batang or cod. Cod is nicer because of its texture. Excellent dish for home cooking rather than eating out.

Pan Fried Fish Fillet (Hong Kong Style) | Christine's Recipes: Easy Chinese Recipes
en.christinesrecipes.com

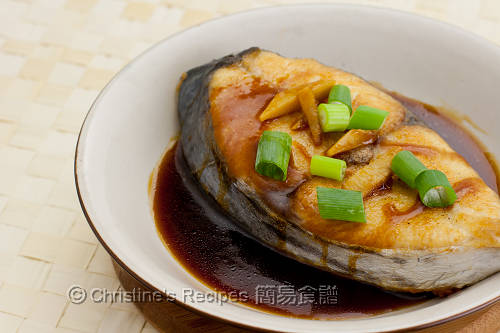
The fish fillet is pan fried perfectly and the sauce is just balanced. It is suitable for kids and seniors, and meat lovers of course, excellent with hot steamed rice.

Pan Fried Fish Fillet01

This is one of my favourite homey dishes often cooked by my mother. I always feel that she’s the best in cooking it.

Pan Fried Fish Fillet02
(Printable recipe)
By Christine’s Recipes
Course: Seafood
Cuisine: Chinese
Prep time: 5 mins
Cook time: 15 mins
Yield: 3 to 4 serves

Pan Fried Fish Fillet
Ingredients:
  • 1 piece fish fillet (mackerel or other white fish)
  • salt, to taste
  • pepper, to taste
  • ½ tbsp Shaoxing wine
  • cornflour/corn starch, for coating fish fillet
  • 1 tsp shallot, minced
  • 2 to 3 slices ginger, shredded
  • 1 stalk spring onion, diced or shredded
Sauce:
  • 1½ tbsp light soy sauce
  • 2 tsp dark soy sauce
  • 2 tsp sugar
  • 6 tbsp water
  • sesame oil,to taste
  • pepper,to taste
Thickening:
  • 1 tsp cornflour
  • 2 tbsp water
Method :
  1. Rinse fish and wipe dry with kitchen papers. Season with salt, pepper and wine. Let sit for 10 minutes. Lightly coat with cornflour. Set aside.
  2. Heat oil in a non-stick frying pan. Pan fry the fish over medium-high heat until both sides are golden brown and cooked through. Remove from the pan, cover to keep warm.
  3. Add some more oil in the pan. Saute shallot, ginger and white spring onion dices. Pour in the sauce. Bring it to boil. Add thickening and cook to preferred consistency. Pour the sauce over the fish. Garnish with spring onion. Serve immediately.
Note:
  • You might use any favourite white fish fillets.
 

JakeWade

Alfrescian
Loyal
Thanks a lot for sharing it! That's probably the best butter cake recipe I've found recently. You know, to thank you for that, I'd like to share how to make pico de gallo. Dice tomatoes, onions, and chop cilantro. Add some minced jalapeños, squeeze in some lime juice, and season with salt and pepper. Mix it all up, and you've got yourself a tasty pico de gallo.
 
Last edited:

JakeWade

Alfrescian
Loyal
I love the idea of trying out recipes and food products at home! It's not only fun but also a great way to discover new flavors.
 
Top